Getting Started
This section briefly describes all of the graphical user interfaces so that you
can get started. When you have any question on how to use a specific function you
can get more detailed information in sections that follows.
The software is integrated with Windows operating system. You interact with the
software through the following:
- The Start menu
- The iSafeguard™ taskbar menu
- Windows explorer
- Internet Explorer's context menu
- The Personal Information Editor
- GUI added to supported Windows applications
and
- Hotkeys
Icons Used in iSafeguard™
The following table lists the file icons used in the software:
|
File Extension |
Icon |
Description |
|
xce |
 |
Encrypted file |
|
xcs |
 |
Digitally signed file |
|
xcb |
 |
Digitally signed and then encrypted file |
|
xca |
 |
Signed and/or encrypted archive file |
|
pie |
 |
Personal information file |
|
cer |
 |
Standard X.509 v3 certificate file |
|
xcc |
|
MXC extended X.509 v3 certificate file |
|
xck |
 |
MXC key file |
|
profile |
(none) |
Default iSafeguard™ profile |
The following table lists the icons used to show the general status of certificates.
 |
The certificate is valid and trusted. |
 |
The certificate has expired or is revoked. It is not valid for signing and encryption
but may be valid for verifying and decryption. |
 |
The certificate is not valid or not trusted. |
The following table lists the icons used to show the detailed information about
certificates.
 |
Basic certificate field |
 |
Critical certificate extension |
 |
Non-critical certificate extension |
 |
Certificate property |
The Start menu is shown is the following figure. Brief descriptions of each of the
menu items are shown in the table below.
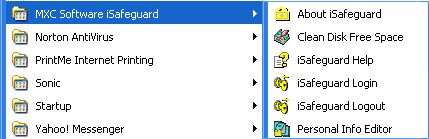
Start menu items:
|
Menu Item |
Description |
|
About iSafeguard™ |
Show the about dialog box containing version information, etc. |
|
Clean Disk Free Space |
Start the disk free space cleaner wizard. |
|
Help |
Start the HTML help. |
|
Login |
Login to iSafeguard™ so that you can use your private keys and certificates
stored in your profile. |
|
Logout |
Logout of iSafeguard™. After logout crypto operations cannot be performed. |
|
Personal Info Editor |
Launch the Personal Information Editor. |
If you are logged in, a golden lock icon will be shown on the bottom right hand
side of the taskbar tray where you may find a speaker and time as well, as shown
in the figure below.

When you place your mouse on top of the golden lock icon, "iSafeguard™ Enterprise"
or "iSafeguard™ Professional" will be shown on the screen.
When you click the right mouse button while the cursor is on top of the icon, the
following popup menu is shown.
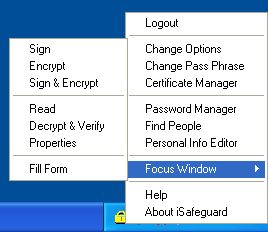
The menu is very much self-explanatory. If you have any question just play with
it to see what happens. You use this menu to change the program settings, change
your login pass phrase, start the Personal Information Editor, run the Certificate
Manager, and get product information, etc.
Here is a brief summary of the menu items:
|
Menu Item |
Description |
|
Logout |
Logout of iSafeguard™. After logout crypto operations cannot be performed. |
|
Change Options |
Change iSafeguard™ option settings. These settings include the encryption
algorithm, signature algorithm, etc. |
|
Change Pass Phrase |
Change your login pass phrase. Your profile will be re-encrypted with your login
name and your new pass phrase. |
|
Certificate Manager |
Launch the Certificate Manager. You use it to manage your keys and certificates,
such as exporting your certificates to a file to distribute to other people, importing
other people's certificate to your profile, etc. |
|
Password Manager |
Launch iSafeguard™ Password Manager that you use to manage the passwords of
your accounts. |
|
Find People |
Launch iSafeguard™ Find People window. You use it to find people's certificates
from Internet Directory Services. |
|
Personal Info Editor |
Launch the Personal Information Editor. If you have not logged in, you are asked
to login. |
|
Focus Window |
Allow users to sign and encrypt the content of the window that currently has the
input focus, etc. |
|
Help |
Launch iSafeguard™ help. |
|
About iSafeguard™ |
Show the about dialog box. |
There are duplicate menu items in the shell context menu and the taskbar menu to
give you easy access to iSafeguard™ functions.
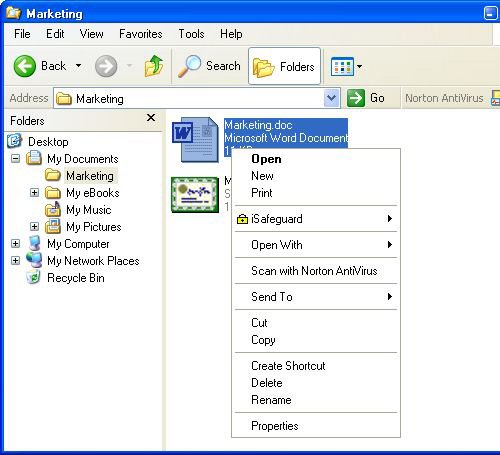
iSafeguard™ is integrated with Windows shell. You may use many of its functions
from Windows Explorer. Depending on your selection in Windows Explorer and whether
you are logged in or not, you will see a different context menu from Windows Explorer
when you click the right mouse button.
|
|
Single file selected |
Multiple files, folders selected |
Context Menu When
User Logged in |
|
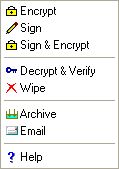 |
Context Menu When
User not Logged in |
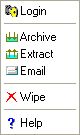
|
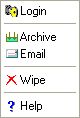 |
The following figure shows the context menu when a drive is selected.
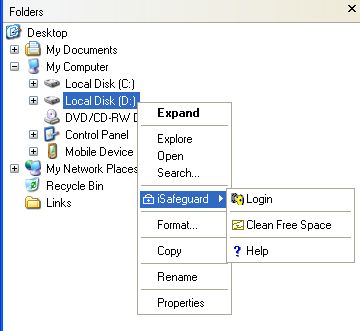
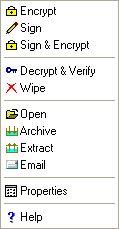
The following table lists the complete iSafeguard™ context menu items.
|
Menu Item |
Description |
|
Encrypt |
Encrypt the selected files, may include files in the sub-directories. Refer to section
Signing & Encrypting Files
for details. |
|
Sign |
Sign the selected files, may include files in the sub-directories. Refer to section
Signing & Encrypting Files
for details. |
|
Sign & Encrypt |
Sign and then encrypt the selected files, may include files in the sub-directories.
Refer to section Signing &
Encrypting Files for details. |
|
Decrypt & Verify |
If the files selected are encrypted files, they are decrypted. If the files are
signed files, the signatures are verified. If the files are signed and then encrypted,
they are decrypted and then the signatures are verified. May include sub-directories. |
|
Wipe |
Securely delete files. The contents of the selected files are first overwritten
with 0s and then 1s and then random numbers. The process is done N times. N is
the number of passes you specify. After the contents are wiped out, the file names
are renamed, and finally the file is deleted. May include sub-directories. |
|
Properties |
Display the selected file's crypto properties, currently the intended recipients
and the signer as well as the encryption and signature algorithms are shown. |
|
Open |
Open the selected the file; if the file is encrypted it is decrypted; if it is signed
the signature is verified; if the file is signed and encrypted it is decrypted and
signature is verified; and finally its associated program is launched to open the
file. |
|
Archive |
Create an archive file of the selected files and folders. This operation will always
include the sub-folders of the selected items. Refer to section
Creating and Extracting Archives for details. |
|
Extract |
Extract the selected archive file to the folder you specify. Refer to section Creating and Extracting Archives for details. |
|
Email |
Launch a new email composition window and attach the selected files to the email.
Files under folders will not be attached. To email whole directories and sub-directories
use iSafeguard™ archiver. |
|
Clean Free Space |
This tool is used to clean up the free space of your hard drive to erase any sensitive
data left behind when files are deleted (not wiped). Refer to section
Cleaning Disk Free Space for details. |
|
Help |
Show help topics. |
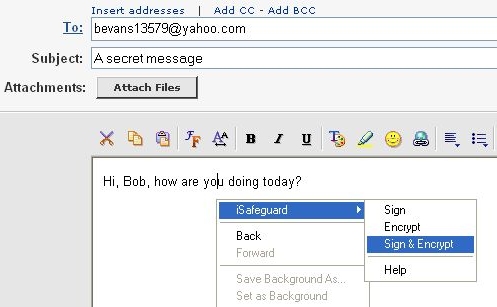
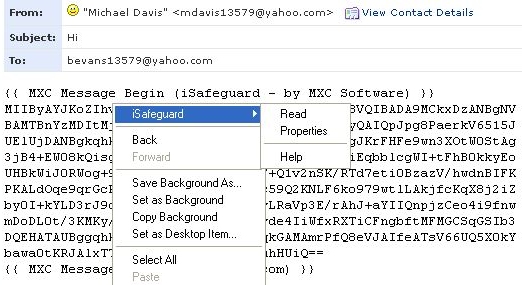
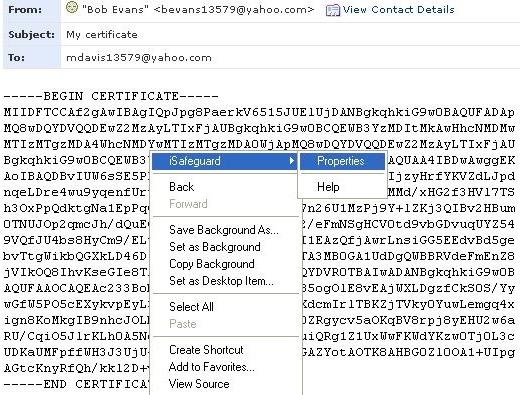
If you use Internet Explorer as your email client you can use the Internet Explorer's
context menu to sign, encrypt or decrypt your emails. Screen shots of the context
menus are shown below (used Yahoo! Mail).
Screen shot for signing and encryptging an email message:
Screen shot for reading encrypted email message:
Screen shot for importing a certificate:
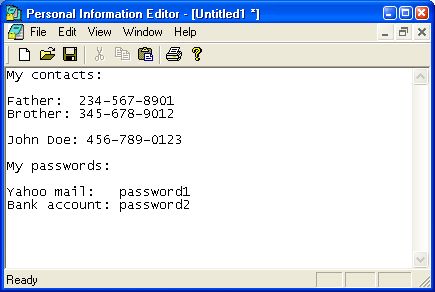
Personal Information Editor (PIE)
The Personal Information Editor is a secure text editor. If you know how to use
Notepad you already know how to use PIE. When you save your text in PIE the text
is encrypted before saving to disk. When loading your pie file back from disk the
editor decrypts the text before showing it to you.
A screen shot of the editor is shown in the following figure. The PIE is a perfect
tool to keep your confidential information secure.
Drag and Drop Supports
iSafeguard™ Certificate Manager supports drag and drop. You can
- Drag a certificate/key file from Windows Explorer and drop it to the Certificate
Manager
- Drag base64 encoded text from your email program and drop it to the Certificate
Manager
- Drag a certificate from the Certificate Manager and drop it to your email program
Drag and drop supports make exporting your certificate and importing other people's
certificates extremely easy. See later sections of this manual for more information.
|